
My name is Luiz Ribeiro and during this summer I am working on creating a Scripting Plugin for Gephi, mentored by Eytan Adar from the GUESS project and co-mentored by Mathieu Bastian. This article will give you an overview of the current status of the project and also what you can expect from future work.
Background
The Scripting Plugin originated as a joint proposal with the GUESS project which aimed at porting the Gython language as a console plugin for Gephi during the Google Summer of Code. For those who are not familiar with it, GUESS is a software that was originally created to support the interactive manipulation of graph structures. This feature is achieved through a mix of a visualization framework and a domain-specific embedded language called Gython.

As you have probably already guessed, Gython is an extension of the Python programming language or, more specifically, Jython, which is a Java implementation of Python. Thus, Gython is backwards-compatible with Python itself and can be used with many different Python 2.5 libraries without much pain.
By adding new operators for handling graph structures to the Python’s grammar and exposing nodes and edges as first class objects to the scripting language, Gython turns out to be a very powerful and concise language to work with graphs.
Since the GUESS’ implementation of Gython is based on Jython 2.1.0, we opted for a complete rewrite of its source code. Gephi’s implementation of Gython works over Jython’s latest stable release, version 2.5.2. Besides, our implementation does not support all the original features that were present on GUESS and focuses on a better integration with the Gephi Toolkit. At the moment, our plugin supports most operations of the Graph API, Attributes API and Filters API. This means you can create and remove nodes/edges from the graph, manipulate nodes/edges attributes and also build filters and run queries on the graph.
Over the next section, I will guide you through a small tour of some of the current features of the Gephi’s Scripting Plugin.
Current Status
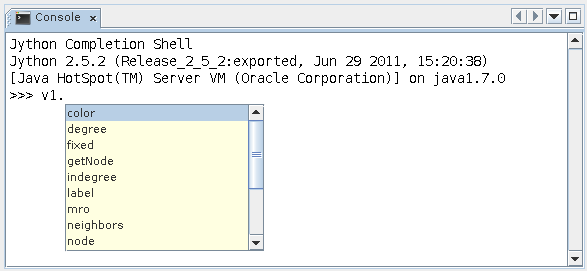
The scripting console can be accessed through the Window menu from Gephi’s UI. After opening up, the console looks like this:

Thanks to jythonconsole, the console supports code completion. On the screenshot above you can see that the console suggests many different attributes for a given node in the graph.
Add/remove nodes and edges
Like on GUESS, there is a reserved variable name “g”, which corresponds to the main graph from the current workspace. This object has many methods for manipulating the graph like addNode, addUndirectedEdge, addDirectedEdge, among others. So, for example, for adding two new nodes to the graph and an undirected edge connecting them:
>>> g.addNode()

v1

>>> g.addNode()

v2

>>> g.addUndirectedEdge(v1, v2)

e1
As you can see, each node of the graph can be accessed by prefixing the node id with “v” and each edge can be accessed by prefixing the edge id with “e”.
Operators
One of the most interesting features of Gython is that it has four new operators for selecting edges, ->, <->, <- and ?. These operators work as follows:
- v1 <-> v2: selects the undirected edge connecting nodes v1 and v2;
- v1 -> v2 and v2 <- v1: selects the directed edge from node v1 to node v2;
- v1 ? v2 selects any edges connecting nodes v1 and v2.
Handling attributes
Consistently with Python, all the nodes and edges’ attributes from the Data Laboratory can be accessed directly as objects’ attributes from the console. Topological attributes like a node’s degree also can be accessed directly by calling v5.degree, for instance.
If you have a node attribute column called “gender” you can access it directly, for example:
>>> v42.gender = "female"

>>> v42.gender

"female"
Filtering
In my opinion, filtering is where the console really stands out. Building complex filters is as simple as typing a single command. Let’s start with an elementary example: say that you have a graph with your Facebook social network and you want to view only the subgraph of women in your network, you would call something like this:
>>> visible = g.filter(gender == "female")
This means that you are filtering the main graph “g” for nodes that have the attribute gender equals to “female” and afterwards you set this resulting subgraph as the visible graph. Further, you can also filter the visible graph. For example, if you want to filter the visible graph to show only the nodes that have degree greater than 5 on it:
>>> visible = visible.filter(degree > 5)
The intersection and union operators available on the Gephi’s Filters Window can be used with the & and | operators from the language. For example, the following commands will build a filter that filters nodes that are in the human resources department and are more than 45 years old:
>>> someFilter = (dept == "HR") & (age > 45)
Note that this time the resulting filter has been assigned to a new variable (even though you could have applied the filter directly). If you want to filter the main graph with the newly created filter and set the resulting subgraph to the visible view, just run the following command:
>>> visible = g.filter(someFilter)
You can also add a filter created from the console to the Filters Window by executing the following command:
>>> addFilter(someFilter)
Finally, if you want to set the visible view to the main graph again, just type:
>>> visible = g
Conclusion and Future Work
Obviously, this is just a quick overview of the scripting console functionality. Over the next few weeks I expect to release an alpha version of the plugin to the community and also an user guide with some more detailed examples. Also, a documentation of the plugin’s inner-workings should be coming soon too (i.e. a more up-to-date specification than the one available on the wiki), in case you’re interested in contributing to the development.
If you are interested in trying the plugin right now and testing the code, you can download it from my Bazaar branch on Launchpad:
bzr branch lp:~luizribeiro/gephi/scripting
There are many features that we still want to implement, including:
- Allow users to import and export graphs from the console;
- Support for running layouts with console commands;
- Integration with the Partition and Ranking APIs.
If you have any ideas or suggestions, feel free to leave a comment. Feedback is always more than welcome!

 A new release of the

